This post may contain affiliate links, meaning Off the Eaten Path may receive commissions for purchases made through those links — at no cost to you. All opinions are our own. Please read our full disclosure for more information.
As the quintessential morning cocktail, a build your own Bloody Mary bar is the perfect tailgating tool for an early kickoff or a great way to serve brunch cocktails to your guests.
I’m not sure why, but after living in the state for seven years, I can definitely say that the Bloody Mary is a staple at Wisconsin bars, restaurants, breakfast joints, and football tailgates.
As a Packers fan, I’ve been to my fair share of pregame tailgates, which are such a fun way for fans to get excited for games: a gathering of diehard football fans with great food, good music, cold drinks, and a whole lot of team spirit.
Most of the cold drinks you’ll see at Packers tailgates are beer. And the mechanism for keeping beer cold isn’t a cooler…it’s the snow banks that surround Lambeau Field in the winter months.
No cooler required when you can stick your beer in a snow bank!
But what about if you’re dealing with an early kickoff? Or have tailgate guests who aren’t beer drinkers?
I am definitely not opposed to a pre 9AM beer, but…when there’s a noon kickoff or you’ve invited some cocktail connoisseurs to game day, Bloody Marys and tailgating go hand-in-hand.
I’m not going to judge you if you put down a beer (or a few) before noon. But beer may not be everyone’s favorite morning beverage, so this is where a build-your-own Bloody Mary bar comes in handy
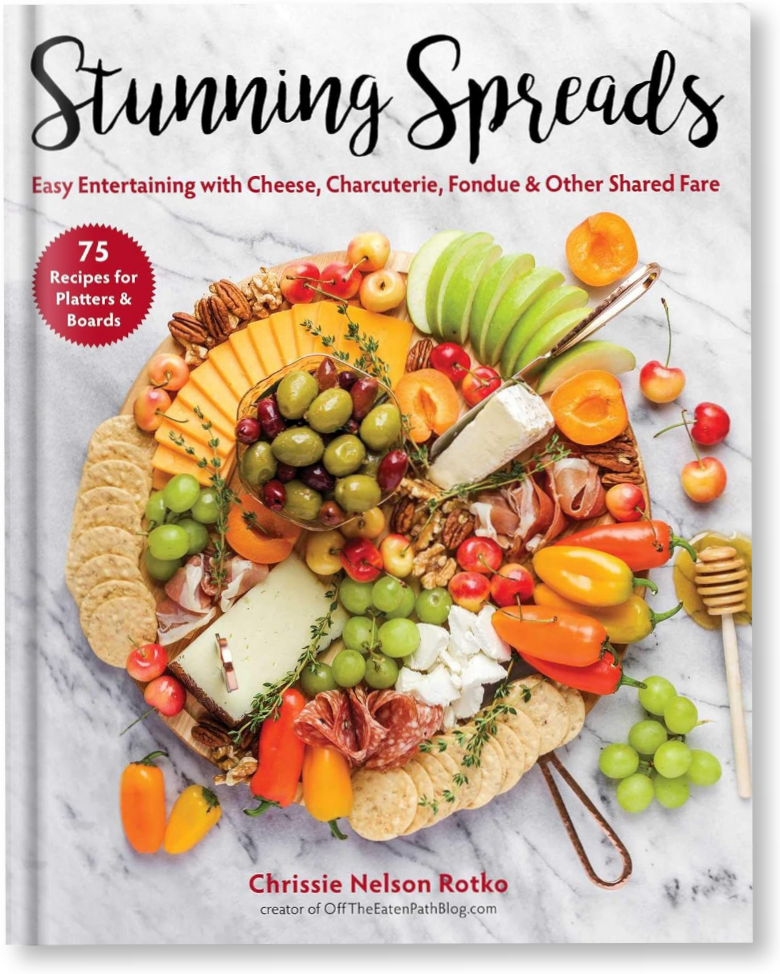
Love entertaining? Check out my cookbook!
Stunning Spreads features 75+ approachable appetizers paired with a variety of simple, seasonal cocktails that are sure to be the showstopper at your next gathering. I’ve even included helpful hosting advice for preparing and serving everything from big boards to small bites.
Similar to a bagels and lox brunch board or a taco bar, a build-your-own Bloody Mary Bar is just like it sounds: it’s a fun way to let your guests build the ultimate cocktail of their choice!
Everyone I know likes their Bloody Marys a little bit different. Some people like them spicy, some people like them super savory, some people love them with simple garnishes, and others like them loaded up with all of the fixings.
When you set up a Bloody Mary bar, you don’t have to try to anticipate how everyone will like their drinks. Your guests can create the cocktail of their dreams themselves!
Plus, Bloody Mary bars are really easy to prep ahead of time, so you get the hard work out of the way and can relax with a cocktail (or two) before kickoff or before guests arrive.
This is perfect for tailgates, holiday brunches, bridal showers, bachelorette parties, and about a hundred other occasions. Trust me, it’s so fun that your guests will be raving about it.
What you need for the ultimate Bloody Mary bar
When you’re prepping your Bloody Mary bar, you have the option to make your own Bloody Mary mix and prepare a lot of the garnishes at home. But this setup is just as fun with store-bought mix and prepared garnishes, so you can really make this as easy for yourself as you want.
Bloody Mary mix
A good Bloody Mary bar starts with a good Bloody Mary mix. It’s the main ingredient after all, and the base to which your guests will create a DIY Bloody Mary to their liking.
The best bloody mary recipe is my homemade Bloody Mary mix. The base of this mix is plain tomato juice because I like starting with a blank canvas, to which I add plenty of herbs and spices for tons of flavor.
But you can also use Clamato juice, V8 juice, or even a store-bought, good Bloody Mary mix like Zing Zang or Mrs. T’s. You’ll need about 30 ounces of mix for 6 cocktails.
Alcohol
A classic Bloody Mary cocktail calls for vodka, but I like to offer gin and tequila as options as well.
Each cocktail uses 2 ounces of alcohol, so I like to set out 12 ounces of each spirit when planning for 6 cocktails. You can leave the spirits in their original bottles or pour what you’ll need into smaller (labeled) decorative glass bottles.
Salt rim
I love a good Old Bay salt rim. I mix up my own using 1 tablespoon of Old Bay and 1 teaspoon of salt.
You can also use your favorite store-bought rimming salt instead of prepping your own.
Make sure to set out lemon and lime wedges for wetting the rims of the glasses, too.
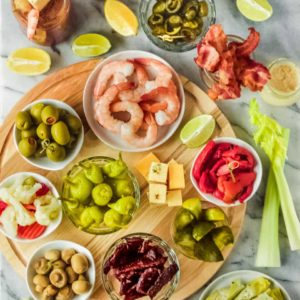
Condiments
This is where your guests can really start to get creative. Let them add condiments to their cocktails to really amp up the flavor however they like.
There are lots of options for condiments you can set out, so choose a handful that you think your guests will enjoy most.
Some ideas include:
Spices: Flavored salts, black or cayenne pepper, paprika, curry powder, chili powder, Old Bay seasoning, Cajun seasoning, lemon pepper seasoning, caraway seeds, etc.
Dried herbs: Dill, rosemary, thyme
Hot sauce: If you only set out one hot sauce, choose a classic one such as Frank’s Red Hot, Crystal, or Cholula. Including several hot sauce options is always more fun, though!
Prepared condiments: Worcestershire sauce, prepared horseradish, hot mustard, wasabi, steak sauce, cocktail sauce, teriyaki sauce, red chili paste, etc.
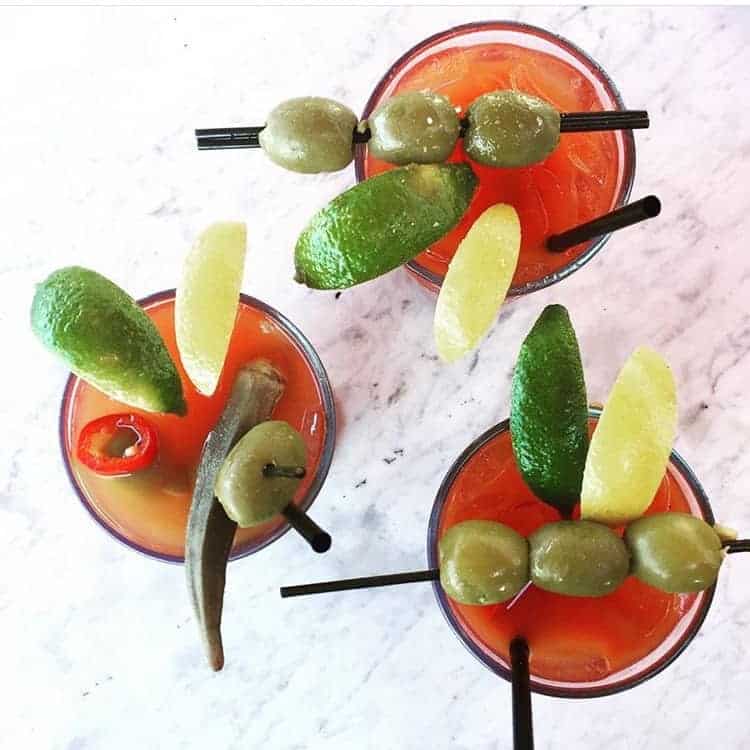
Juices: Pickle juice, olive juice, lime juice, lemon juice
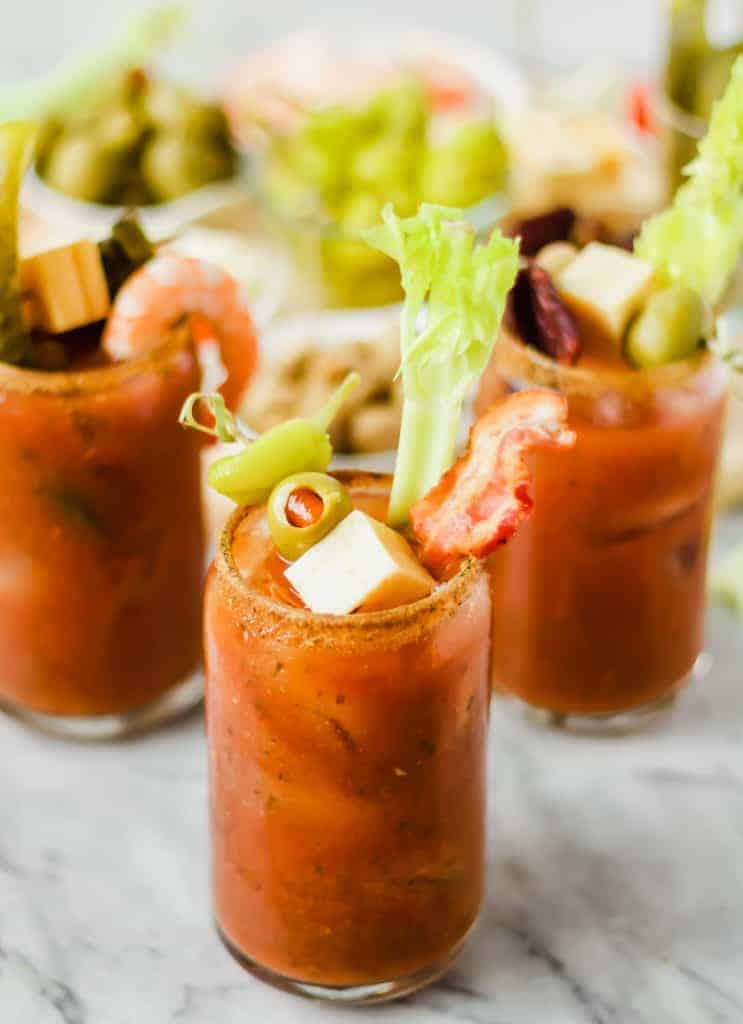
Garnishes
Once your guests add all of the flavors to please their palates, they’re going to want to garnish and load their drink with snacks and other trimmings.
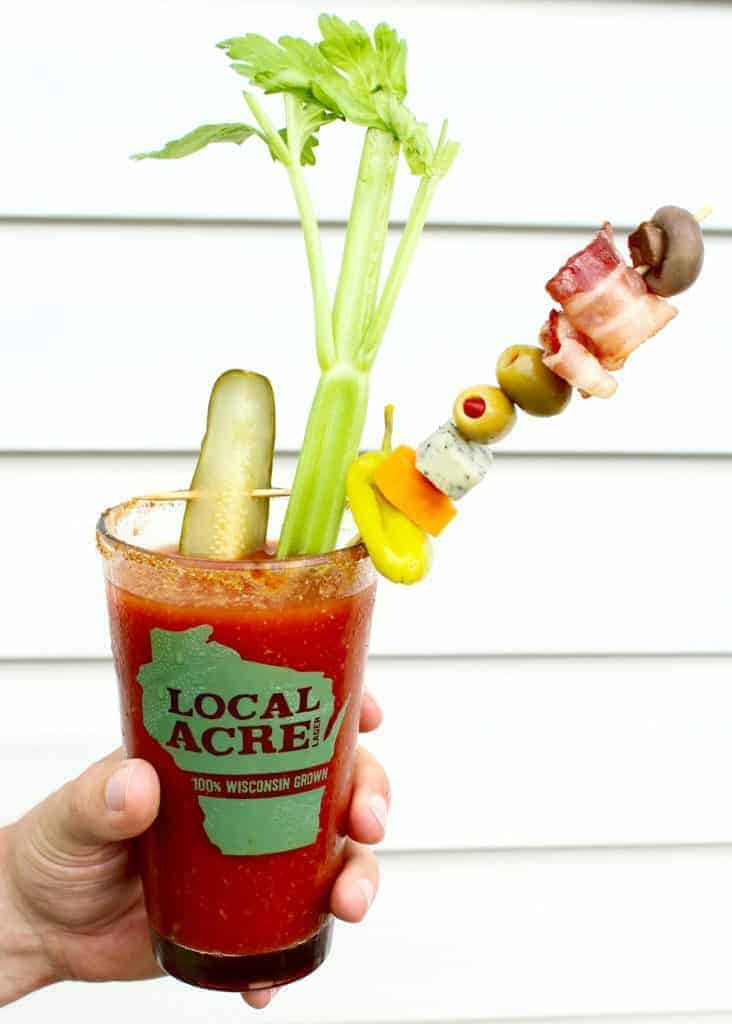
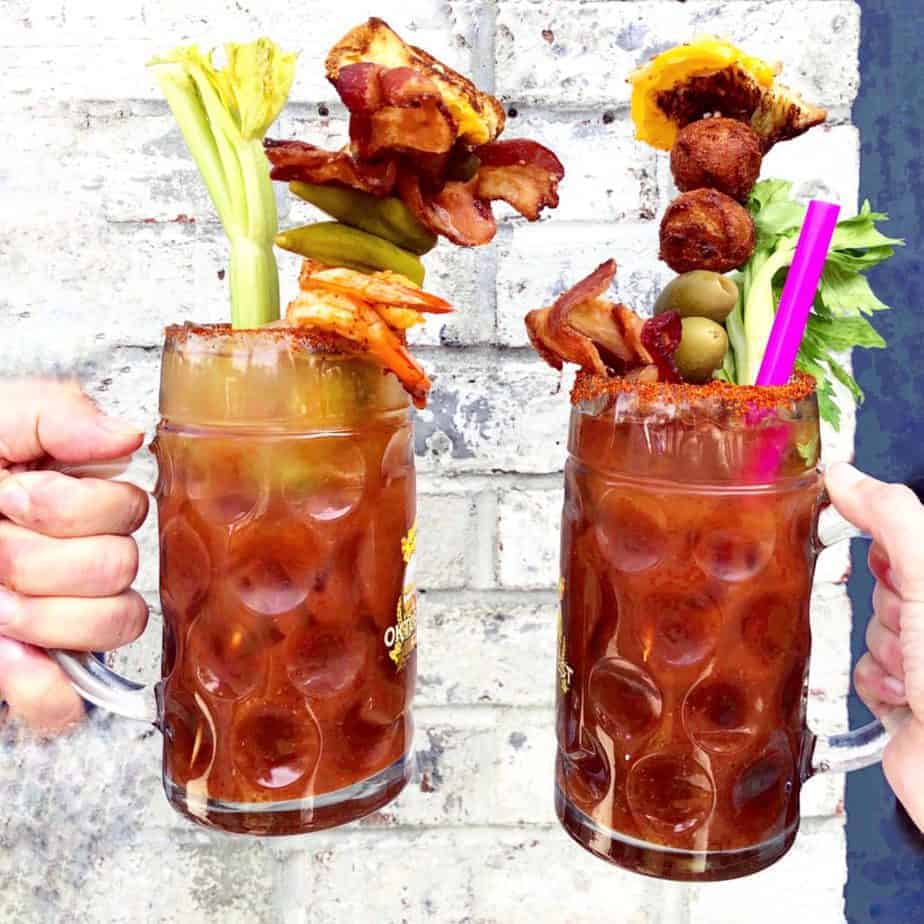
In Wisconsin, we call Bloody Mary toppings or garnish “the salad” because you can get to the point where the toppings practically become a full meal!
Most people will reach for the larger skewers to make their own Bloody Mary salad; skewers are perfect for this process because they maximize the amount of toppings you can include with your drink!
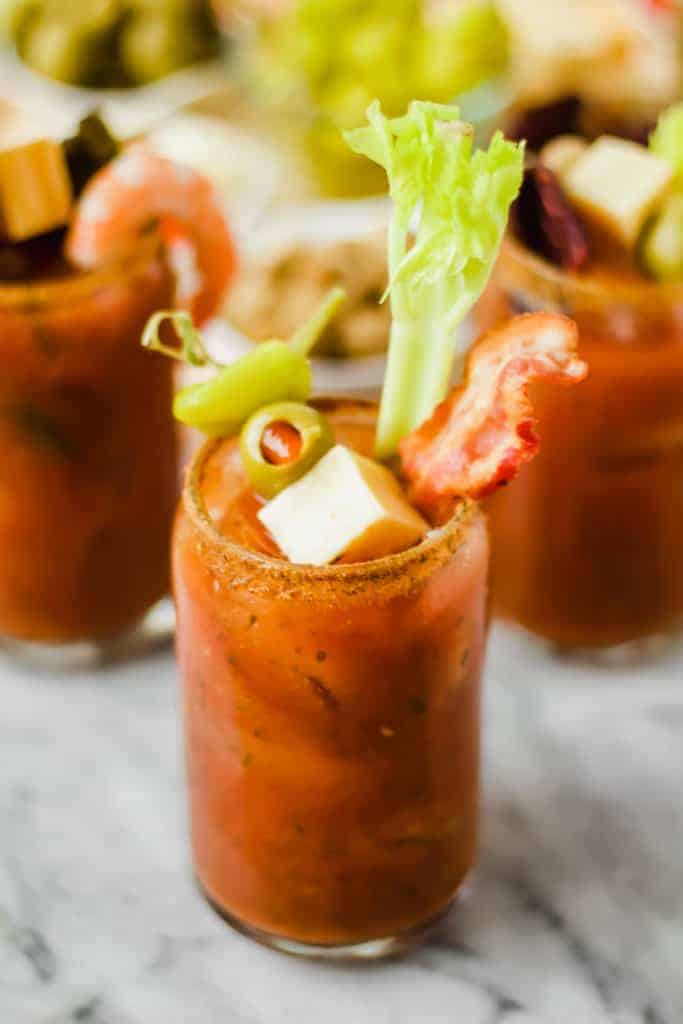
While a celery stick is the typical Bloody Mary garnish, encourage guests to think outside the box by setting out a variety of fun and delicious garnish options like:
Cured meats: Meat sticks, bacon (try making maple black pepper bacon for an extra-fancy touch), beef jerky, salami, etc.
Fresh vegetables: Celery sticks, carrot sticks, bell pepper slices, fresh jalapeños, cherry tomatoes, etc.
Pickled or marinated veggies: Dill pickle spears, pickled onions, pickled green beans, pickled beets, cocktail onions, giardiniera, artichoke hearts, roasted red peppers, pepperoncini peppers, etc.
Don’t forget ice! Unless you have a really big ice maker at home, you’ll probably just want to pick up a bag of ice from the grocery store or gas station.
You can use an ice bucket if you have one, but a clean cooler works great, too.
Tools and glassware
Bloody Marys are typically served in highball glasses. If you don’t have highballs on hand, any taller glass, such as pint glasses or even mason jars, will work.
You can also set out disposable cups if you don’t want to worry about extra cleanup later.
Some other tools and serving pieces I suggest setting out include:
Assorted small bowls and/or plates: For condiments and garnishes
Assorted small spoons, cocktail forks, and/or tongs: So guests can easy grab the condiments and toppings they want
Make-ahead tips
You’re going to want to get all the work done for the DIY Bloody Mary bar before your party or bunch. That way, your focus can be on fun and free you up from bartending duties!
You can make the Bloody Mary mix a few days in advance and store it in an airtight container in the fridge. In fact, it tastes better after at least 12-24 hours in the fridge, so I recommend doing this step ahead of time!
You can also prep your toppings ahead of time: Wash and chop any fresh or pickled veggies you’re using, cube the cheese, and cook any proteins that need to be cooked.
If you’re doing this the day before or if you are transporting the ingredients for your Bloody Mary bar, pack everything up in individual containers and keep them chilled until it’s time to set things up.
If you’re hosting at home and prepping a few hours ahead of time, you can go ahead and put the toppings in serving bowls and cover lightly with plastic wrap. Toppings that don’t need to be refrigerated can be set out on your serving space and everything else can hang out in the fridge until just before serving
Setting up your Bloody Mary bar
I recommend setting up the Bloody Mary bar in a space that is out of the way of your main entertaining area. Sideboards, an out-of-the-way section of your kitchen countertop, or a folding table set along the side of the room are all great options.
Set up the bar so that the components are arranged in the order guests will need them in.
Start with glassware and the salt rim with lemon and lime wedges, followed by the ice.
Next, pour the Bloody Mary mix into a large pitcher or carafe and add it to the bar along with the alcohol.
Condiments come next, followed by the garnishes next to the toothpicks and skewers.
Since things are bound to get a little messy, you may want to add a stack of napkins, too!
Making the Bloody Marys
When guests are ready to mix up their cocktails, all they need to do is grab a glass and, if they like, wet the edge of the glass with the lemon or lime wedges and dip it into the salt rim.
Fill the glass with ice, then add 2 ounces of the spirit of their choice and about 5 ounces of Bloody Mary mix.
Now they can add the condiments of their choice, followed by the “salad” of their dreams!
DIY Bloody Mary Bar
Chrissie Nelson Rotko
Let your guests create their own cocktails at your next brunch or tailgate with a DIY Bloody Mary Bar!
1batchBloody Mary mixor about 30 ounces store-bought mix
12ouncesvodka
12 ouncesgin
12 ouncestequila
Assorted condimentssuch as hot sauce, prepared horseradish, Worcestershire sauce, olive juice, etc.
Assorted garnishessuch as celery stalks, stuffed olives, pickled or marinated vegetables, beef jerky, cubed cheeses, etc.
Instructions
Set up the Bloody Mary bar:
On a shallow plate, mix the Old Bay and salt for the salt rim.
1 tablespoon Old Bay seasoning, 1/4 teaspoon salt
In the location where you plan to set up your Bloody Mary bar, place highball glasses or cups and ice at one end. Next, arrange the Bloody Mary ingredients in the order that guests will need them.
Ice
Next to the ice and glasses, set up the prepared salt rim with a bowl of the lemon and lime wedges. Next to this, place the pitcher of Bloody Mary mix and the spirits (you can keep these in their original bottles or pour them into smaller glass bottles—be sure to label them if you do this!) with the jigger.
Arrange the condiments on the bar, followed by the garnishes in small bowls next to toothpicks or skewers.
Assorted condiments
Where needed, consider adding small spoons, cocktail forks, or small tongs to make it easier for guests to add the condiments and garnishes to their cocktails.
Assorted garnishes
To make the cocktails:
Use a lemon or lime wedge to wet the rim of the glass, then dip the rim in the salt-rim mixture.
Fill the glass with ice. Top with 2 ounces of the desired spirit, followed by 5 ounces of the Bloody Mary mix.
Have guests add their chosen condiments and garnishes and enjoy!
Note: This post is in no way sponsored, endorsed or administered by the National Football League (NFL) or any of its teams. All opinions and views expressed on our blogs are our own, not that of the NFL and/or any of its 32 teams. Any team names, logos or other symbols referenced are properties of their respective organizations. We are just big fans — and we want to share our love for our teams, the game and the food that brings us all together on game day.
about chrissie
I’m Chrissie — a full-time public defender, food lover, North Carolina explorer, toddler wrangler, and lifelong cheese enthusiast. I love the beach, craft beer, Mexican food, and trashy reality TV. Catch me chasing my kids, laughing too loudly, sipping margaritas on a nearby patio, and telling my husband “just one more quick picture.” Learn more ➤


I love food bars, so why I never thought of this is beyond me! This is such a fun idea for an early gametime. I am sooo doing this!
I’m so glad you like it! Every time we’ve done a Bloody Mary bar at a tailgate it’s been a big hit!
I LOVE this idea and will definitely be doing something like this soon. Thanks for the great post.
Thank you, Camilla! I hope that it’s a hit!
What a great idea! I love a good bloody mary bar!
Thank you, Erin!
I love bloody marys…this is such a great idea! Perfect for Sunday morning football watching!
The best way to get a weeks worth of veggies is with a bloody mary on the weekends.
Something about bloody mary’s when I am at the beach they just seem to be a must have.
Cheers!
Yes! So many veggies in a BM! and I also love Bloody Marys at the beach. And at a football tailgate.